Task
One of our user says:
We currently have a set of documents that are printed from a shared folder on our file server daily, at the moment a member of staff uses Print Conductor to print the documents, then moves the files to an archive once completed. If we could set up scheduled printing then I could schedule the moving of the files to an archive after the printing has completed, which would automate the whole process.
Solution
This task can be completed with 2Printer, which acts in this case as print scheduling software.
The process consists of four subtasks:
- Set specific time or condition to run a print job
- Auto print files in a folder
- Move processed (printed) files to another folder
- Archive original files into a RAR or ZIP archive
And all four operations should be performed regularly, for example, every day at 3 PM. We will need 4 things to get this done:
 |  |  |  |
| 2Printer | Windows Task Scheduler | BAT, CMD or Visual Basic batch file (a macro) | WinRAR (or other archiving utility) |
Instruction
An easy way to have 2Printer automatically print your files is to schedule all the necessary commands written in a batch script file. It is not as difficult as it sounds, really. A batch script file consists of a series of commands to be executed by the command-line interpreter, stored in a plain TXT file with a file extension .cmd or .bat. This extension runs with DOS and all versions of Windows, under Command Prompt or cmd.exe. Although batch files (*.bat) are covered in this guide, other scripting languages may also be used.
Create a folder
First off, create a folder, where you will input files to be printed, e.g. "С:\Files to print\".
Create a BAT file
Then create a plain text file (TXT) using Notepad somewhere on your computer. Edit this file and type in the following commands. You can just copy & paste them from here:
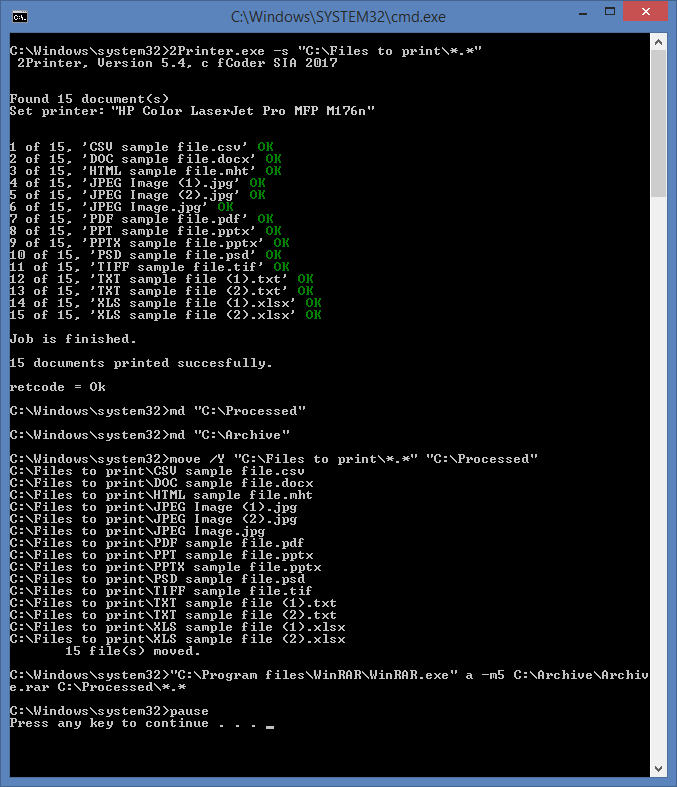
md "C:\Processed"
md "C:\Archive"
move /Y "C:\Files to print\*.*" "C:\Processed"
"C:\Program files\WinRAR\WinRAR.exe" a -m5 C:\Archive\Archive.rar C:\Processed\*.*
pause
Each command should be on a separate line. Please check that the file path to WinRAR.exe is valid. In your Notepad file it will look like this:

This BAT file will:
- Print all files (*.*) from folder "C:\Files to print\" on default printer (2Printer.exe…)
- Create a folder "C:\Processed\" and a folder "C:\Archive" (md - make directory)
- Move printed files to "C:\Processed\" (move) without prompting to confirm overwriting an existing destination file (/Y)
- Archive (a) printed files into a RAR archive at C:\Archive using the best compression method (-m5)
Optionally
*.* selects all filetypes to be processed. Instead of *.* value you can set, for example, *.pdf or *.txt , and only these filetypes will be processed.
If you want to print your files on a specific printer, add -prn value in the first line:
2Printer.exe -s "С:\Files to print\*.*" - prn "[Printer’s name]"
The "pause" line is also optional, use it on initial setup to check that everything is ok. It will pause the command line in case of any mistake in syntax or once the task is complete. When you see that everything works fine, you may remove the "pause" line.
If you don’t need to keep the original files after printing, you can let 2Printer delete them. In this case use the -delsrc attribute in your batch file. This command will delete original input files after they have been printed out. Example:
2Printer.exe -s "C:\Files to print\*.*" -delsrc
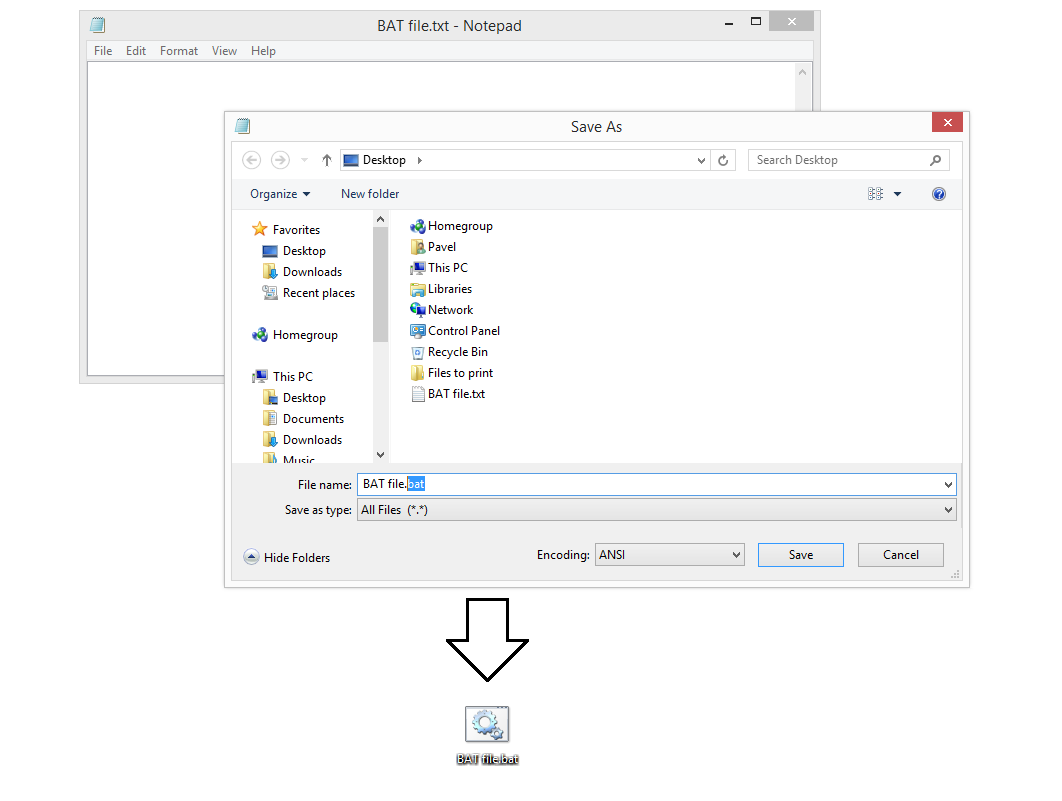
Save your BAT file
Make sure to save it with .bat file extension (instead of .txt):
Schedule printing with a batch file
We have our batch file saved, now we need to schedule it - when or on what condition the file will be launched.
Start Windows Task Scheduler. You will find it at C:\ProgramData\Microsoft\Windows\Start Menu\Programs\Administrative Tools or if you press Windows Start button and start typing "Task Scheduler" in "Search programs and files" menu. Or you can just launch the Command Prompt (Win + R), type in "Taskschd.msc" and press Enter.

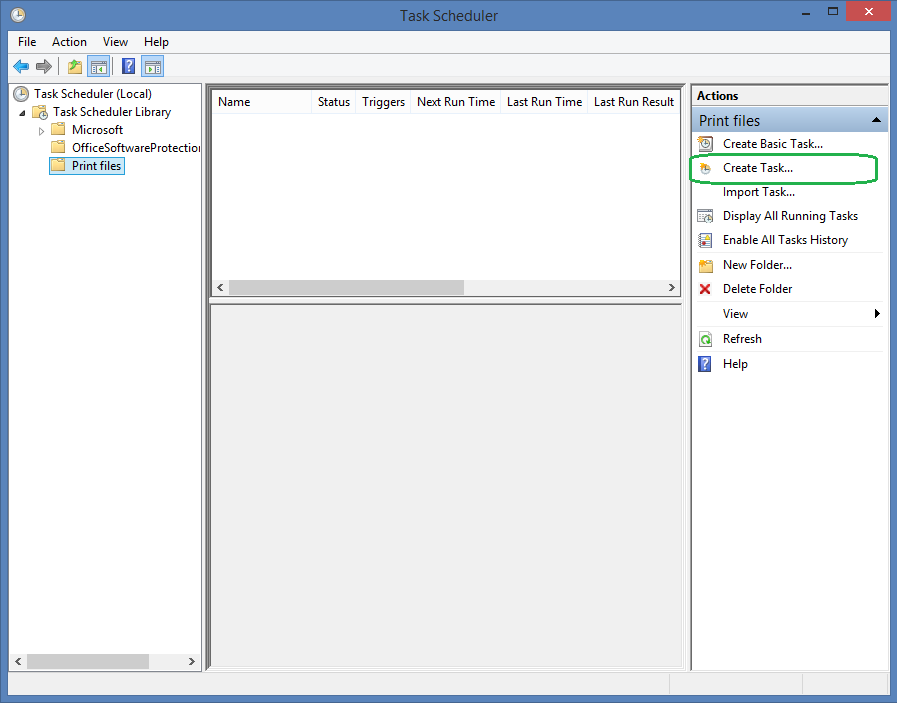
Create a task to be performed
In the left you will see a folder tree with Task Scheduler Library as a root folder. Let’s create a new folder for our scheduled tasks. In the Actions Pane, click New Folder… and set any name for it, for example, "Print files". Then click Create task… and also name it as you wish:

NOTE: We recommend to put a check next to "Run with highest privileges" to ensure the task works fine, no matter what user status you have in the system.
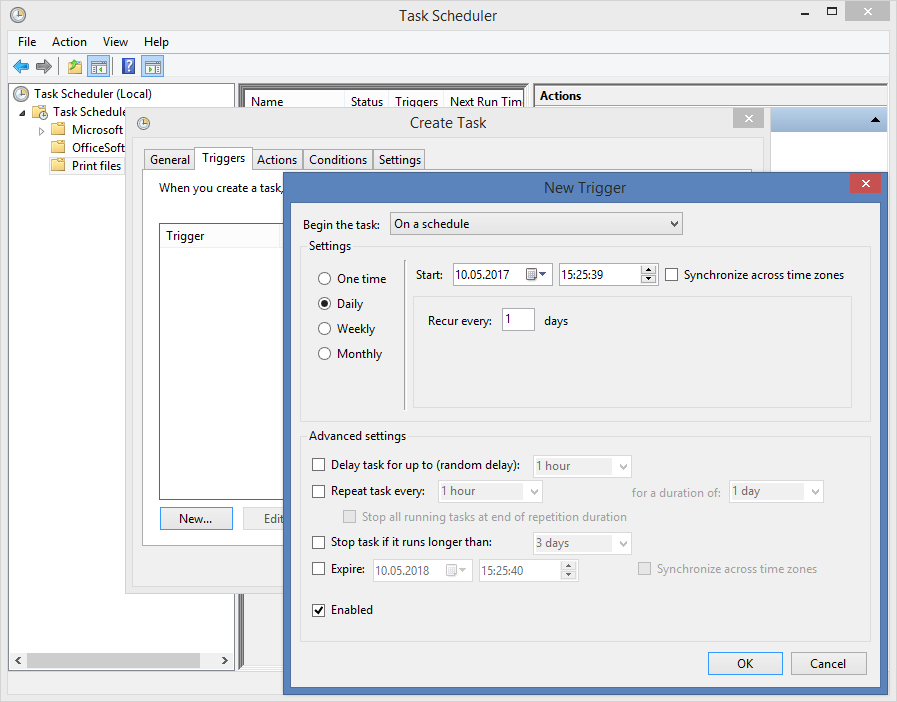
When do you want your files printed?
You can use a time-based triggers or event-based triggers to perform delayed printing. Time-based triggers include starting a task at a specific time of day or starting a task multiple times on a daily, weekly, or monthly schedule. Event-based triggers start a task in response to certain system events. For example, event-based triggers can be set to start a task when the system starts up, when a user logs on to the computer, or when the computer enters an idle state. Each task can contain one or more triggers, allowing the task to be started in many ways. If a task has multiple triggers, the task will start when any of the triggers occur. Create a new trigger on the Triggers Pane:
If your computer is idle...
You can also set a condition that tells the task to wake the computer from sleep mode to run the task when the trigger is activated. Before you set the condition to wake the computer to run the task, ensure that the task will not cause the computer to wake at inconvenient times. To print your files on schedule, if the PC is in sleep mode, place check mark for "Wake the computer to run this task" on the Conditions Pane:

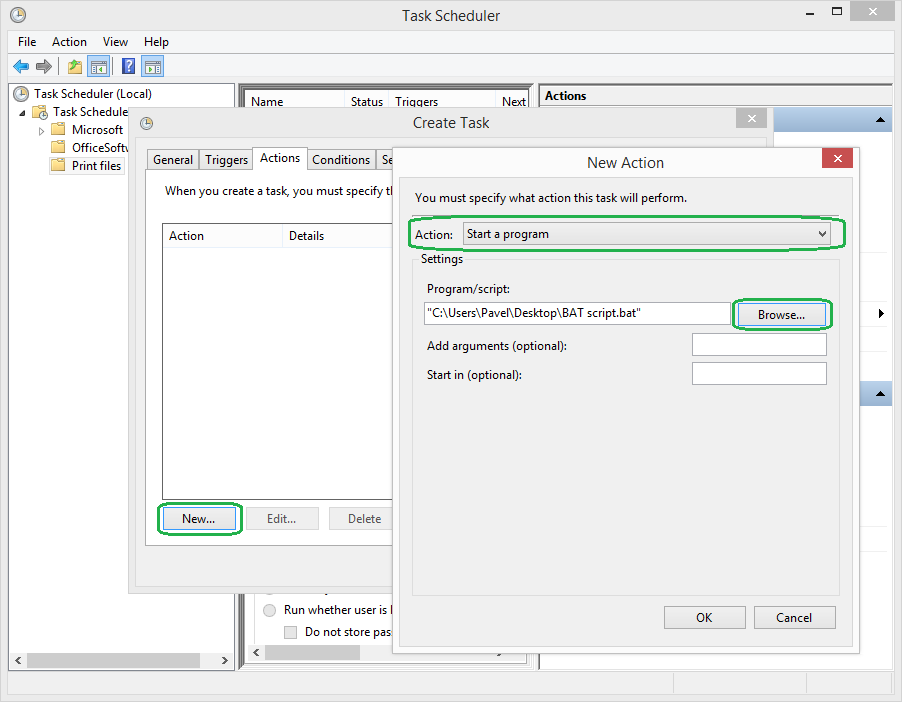
Set path to our BAT file
In the Actions Pane create a new Action, set path to the BAT script file, which we created earlier and click "OK":
All set!
You can now close Task Scheduler. Once a time or event trigger works, the documents from "C:\Files to print\" will be printed out, then will be placed to a new "Processed" folder and after that compressed into an archive "Processed.rar" at C:\Archive:
You can try many other scenarios as well. Learn more about 2Printer’s common commands at:
cmd2printer.com/overview/syntax
Scheduled Printing: How to Print Files on Schedule with FolderMill Service
Using 2Printer combined with Command Prompt, Windows Task Scheduler and other applications gives you endless options to set up your own work system the way you like. As always, feel free to contact us, if you encounter any difficulties on your way.

Need support or advice from our developers? Please leave us a message, and we will get back to you shortly.
